What can I say? Like I said for the Midsummer post, I'm in love with her album Halcyon Days.
It's been a while! One day less than a year since my last Pixel Art Lesson. Should I have waited a day to make it a little more momentous? Probably. Whatever.
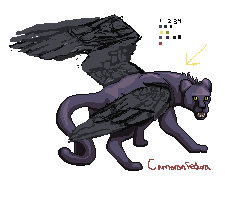
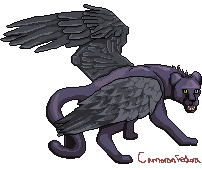
But I recently threw some crits around on a couple pieces on PixelJoint. Most of 'em were pretty small deals, though I suppose I'm pretty wordy even when I'm trying to stay brief. One stands out though - I had a lot of thoughts about the piece Battle! Darkwing by coolsarahkry.
Here's the piece:
Major Themes: Outlines, Composition, Form, Process
If you've read my other lessons so far, you ought to be able to pick out some things for working on.
Now, she's a fairly new member of PJ, and I knew that if I got started I'd be typing a LOT. She'd also stated that she was tired of working on the piece and wasn't going to throw any more edits into it. I feel like that all the time though and I still want some crits though so I can put the lessons to use in the future, so I decided to ask!
Cool if you think it's done, but there's definitely some things that
could use some touching up. I could provide a few crits if you'd like so
you can apply the lessons to future pieces you do if you'd like. Does
that sound like something that would be helpful to you? No pressure to
actually do anything to this piece.
I thought that was polite enough, and I was lucky enough that she agreed that it could be helpful! And then I burst into a wild amount of critique.
Okay, this is going to look terrifyingly dense - sorry about that. I'm
really not trying to pry your piece apart, I'm just overly wordy. Just
take it a piece at a time and don't feel any pressure to get things
right immediately, just try and keep some of these things in mind the
next time you're at the pixel canvas. This might split into two posts if
I was accidentally too long - apologies. Hopefully this is all
worthwhile to you!
I began with a disclaimer because PJ cuts posts at 4000 characters and I wrote more than that. Also because this was lots, like usual.
I'll start with the palette. In general, your palette's fine, so this is more about refinement than repair.
I'll start with the easiest point: you have a couple loose colors, by
which I mean there are a few scattered pixels of colors that obviously
aren't supposed to be there. You have a single pixel of a slightly
different purple on the neck, and a small patch of grays on the
front-left leg. I suspect these are leftovers from a previous draft -
not a big deal.
Another small thing is that I'm confused by the color ramp you selected
for the fur. It's all over the place in terms of both hue and
saturation, without a clear direction. It looks alright, but it makes
the highlight colors look a bit out of place on the fur. The only color
on the fur I feel needs a change would be the dark purple (but not the
outline) - it's way too dark compared to the previous color in the ramp,
it needs a touch less contrast.
Here's a third small thing: you have three separate colors that all read
as a black outline color. Might as well just use one - even zoomed-in I
can't tell the difference without some serious inspection.
That stuff's not a big deal. Makes me wonder what program she's using, since palette management is a built-in feature to GraphicsGale and ProMotion and is easy in Photoshop and GIMP. From another piece she's animation-capable though, so it ain't Paint. This is, of course, completely unimportant but I thought I'd point out the palette-management capacities of various programs.
The biggest trouble with the palette is that it's not very optimized.
You have some bit colors, meaning colors that only appear for a couple
of pixels in the piece without leaving much of an impact. Most notable
are the eye and teeth colors. The yellow you use in the eyes is there
for 4 pixels in the entire piece! Similarly, you have ten pixels of
teeth total, with three different tooth colors, none of which is more
than a single pixel per cluster. You could probably cut it down to a
single tooth color and just the one eye color pretty easily. And beyond
that, then try and see if your bit colors can be integrated elsewhere in
the piece.
Anyway, I could talk for days about palette - it's my favorite subject
and I feel like I have a good grasp of it. However, let's move away from
it and talk about the other things in the piece.
I don't know if it's obvious from my other Pixel Lessons but I really do looooove color. It's my favorite. I could talk about the weird ramp of the fur colors and optimization by intermixing the wing and fur ramps and how to make use of the bit colors (which I should be clear, I made up that term, but it works really well for my purposes). I could talk about contrast and why single-pixel-clusters need it so much. But I didn't think it was worth the post space at this time. Maybe sometime in the future, but today I'm good with what I said.
For once, I'm not gonna talk about lightsource extensively! You seem to
have that in hand here, although when it comes to the tail you kinda
switch to a different light source.
This was probably not necessary to mention, but I think it's totally worth adding elements of praise to a critique. I also neglected to mention that the lightsource falls apart on the wings, but there's bigger trouble with the wings than that.
Instead, let's talk composition. Y'know, pose and form. I looked through
your process thread, and you definitely made great strides in pose as
you progressed, both in the legs and in the form of the wings. One thing
would be the back foot that's obscured by the tail. Because the wing
and the tail block almost the whole leg, and because the foot is very
dark, it was hard to read what that dark spot was at first. You made the
best of the pose you did, but a bit of moving things around might have
made it easier to read. The easiest shift would have been to narrow the
tail, exposing more of the concealed leg. The proportions on that tail
are off - it's enormous, easily as thick as any of the legs.
Another form thing is to consider where the wings are coming from. I
don't get a clear sense of how they connect to the panther - I would've
imagined them to be out of the shoulder region, but they seem to come
laterally out of the sides of the cat.
As for wing anatomy, once you got a reference it started looking much more natural. I really like this progress step:
In my opinion, you would have been best just cleaning up some of the
lines on the wing and leaving it rather than trying to pick out and
define each individual feather. Because of the way you did your edge
highlights, not really following the lightsource, they look flat and
unnatural.
That last line is a big focus in a few minutes because I think that's really the crux of the issue. The feathers need to not be treated as individual components but as part of a whole, following an overall light source rather than given special treatment and edge highlighting. You need some kind of definition to make it read "wing of feathers" and not "blob that follows the lightsource," but too much and you bleed out the depth and the form.
The takeaway lesson for future pieces: Watch your proportions and make
sure that, in addition to being dynamic, your pose allows each part of
the creature to read logically. Use your highlights to define provide
depth rather than to pick out and outline each feature - not every
single separate element needs its own outline and highlight if the
lightsource doesn't really call for it.
I feel like I didn't articulate myself very well here. If this makes no
sense or you'd like clarification/expansion just say so and I can do
that.
Usually when I write critique stuff I separate out linework and
shading into two sections. In this case, it would be easier to talk
about them both simultaneously, as together they make up "form."
I'll put it bluntly: your outlines are hurting you. This is a really
really common thing in pixel art is the urge to give everything its own
outline. The different sections of the face, the feathers, the ridges on
the body, etc. each have their own outlines here. This wouldn't be a big
deal except most of those outlines are black. Black is the darkest tone
you have - and as a side note, it's recommended that you don't actually
use pure #000000 black - and wherever you have it says "this is a dark
shadow." The problem is that on edges of things, we usually don't have
deep dark shadows like that. You look at your arm, and while it darkens
toward the edges you can't actually define an outline. Use your colors
right up to the edge. On a related note, having outlines inside the
piece breaks it up, separating sections off from each other instead of
allowing them to look like part of the same object. That's not to say
don't ever use outlines on things! But be cautious and deliberate when
you do, and know the effect it has on your piece. It flattens it, makes
it look more cartoony, and breaks things up.
There's my diatribe on outlines. I don't like 'em without a specific purpose. I could talk a lot more on that, and a lot more incoherently.
I'll be brief on the idea of "smooth curves" as you seem to show at
least some understanding of that in various sections. I'll just say that
when it comes to longer, more gradual curves (such as the long
feathers) you don't really keep up the natural smooth curves. It's hard
with those large sections, but it shows, so always be careful not to let
your curves get really bent out of shape. You made it extra hard on
yourself - by making that last purple so close to the black, at 100%
zoom it's hard to tell where that dark purple ends and the outline
begins, meaning the unsmooth curves of that dark purple undo some of
your hard work making the outline smooth. Basically, keep in mind that
all your curves should be smooth and form-following, not just the
outlines.
Read, um, almost any other lesson I've written and you can find more about smooth curves. xolstice's "Kiki & Jiji"was my most laser-focused on smooth curves. I find that they're one of the defining features of my own art.
Oh, actually, one other note: the signature. If you're going to have it,
I would put some work into it - you obviously did it freehand. Put a
bit of effort into cleaning it up and making it look smooth as well - by
putting a really rough looking signature on a completed piece you kind
of drag down the overall sense of the piece because the roughness is
distracting.
THIS IS A THING FOR MORE PEOPLE TO HEAR. Seriously. I see a lot of half-assed signatures and it just makes the piece look unprofessional. The WHOLE thing needs to look like you put effort into it - any bits just thrown in, even a signature, do a bit to drag down the whole piece.
Now I'm done. I apologize for writing all this text - I'm a wordy guy
and like explaining things. If there's anything you don't understand, or
want a better explanation of, or something I didn't mention, just ask
and I'll see if I can't do a better job. And I don't mean to scare you
away with all this - you're a good artist (your traditional art stuff on
your dA gallery is pretty good!) and a little knowledge goes a long way
to improving when it comes to pixel art. Keep it up! I'm looking
forward to what you show next!
And I try to ease the blow as much as I can! Desperately. And thankfully it seems that it all comes out okay! Here's her response:
THANK YOU SO MUCH! It means a lot to me that you would write all this up about my piece.
I think you were solidly able to explain your points without making me feel bad(I feel honored, actually).
I really, really, appreciate your advice on color, composition, and the outlines. I will definitely reconsider some of the choices (using multiple shades for the teeth and eyes). The bit colors, I believe you called them. I hadn't known that term, so thank you for bringing it up!
You mentioned using the colors right up to the edge, which is something that I'm interested in trying for next time. Sometimes, I've seen people use lighter outlines for the lighter parts of the pixel. Not sure if you have any advice or opinions of whether that would/could've worked for this(or if that was what you meant, haha).
Give me a second and I'll elaborate on this.
I understand what you're saying about the wings, I think, as in defining them more overall without getting caught up in details. Still, I wonder how to make them look voluminous without losing the detail.
Same here! Just hold on!
I agree with your notes on the composition- now that you mention it, I should have made the leg more visible. I'll try to keep in mind readability for my next composition((pixel or not. Although for pixels I believe each piece holds more weight because of the small size)). I really like what you said about it-
" The takeaway lesson for future pieces: Watch your proportions and make sure that, in addition to being dynamic, your pose allows each part of the creature to read logically."
Also, what you said for shading:
Basically, keep in mind that all your curves should be smooth and form-following, not just the outlines."
^ Always good to know that lack of effort shows. Truthfully, I knew this, but.. my effort did wane at some points.
I say this later as well, but this is totally fine. This is a big piece, and a lot of effort goes into it, and it's natural to take shortcuts.
I might just use a font for the sig next time (I have a cool pixel-looking font saved). Once again, good to know that certain lacks of effort show. I need to know this or I'll stay lazy!
The last sentence there? That's why I do this. (also a font-sig is fine if doesn't do automatic antialiasing)
Basically, wow, thank you~! I'll probably need to read this a few times again as it holds a lot of information, but really, thank YOU! I hope you'll keep an eye out for my next pixel. I look forward to hearing from you again.
This makes me very happy. I won't dwell on my self-satisfaction for now. I did that on Twitter already and I think I've shown enough arrogance for the day.
I felt like there were enough open-ended questions in the reply to do a follow-up! Except, um, my follow-up is longer than the original critique. Oops. I think I came up with some great product though!
*whew* It really makes me happy that you were able to understand and
make use of some of the ideas. Scarin' people away with such
information-dense posts is basically my number one fear. Let's follow up
and clarify some of those things you mentioned! (this is gonna split
into a few posts again, sorry)
I should note: I'm pretty sure I made up the phrase "bit color" but the
idea is definitely out there. It's one of those products of the pixel
art goal of reducing our color count, trying to either make the maximum
use of the colors we have and eliminating colors that aren't really
needed. While not a vital objective to good pixel art (there's some
great high-color work, like by TheoVision), it's a sign of skilled craft
to only use as many colors as you need to achieve your desired
aesthetic.
TheoVision is a PJ user who often used high color counts, often as high as 32 in even small pieces, though he displayed an obvious skill in low-color situations too (I use the past tense cuz he hasn't posted new art in years).
This one is by far his highest-color piece, and is impressive (if imperfect). I mention him mostly to emphasize how high-color art isn't necessarily a bad thing, even in pixel art, it's just a crutch if you're not doing it with very specific purpose.
Do you notice how I talk a lot about how "bad" techniques can be fine if used with deliberation and understanding? It's pretty much a trick in art in general. Any rule can be broken and a good product produced so long as it's done carefully and intentionally, but break the rules right and you branch into other mediums. For example, pixel art's generalized rule against "tools" such as automatic antialiasing on brushes. You break that, you're probably straying into digital painting, not pixel art. It's why the digital medium is so complex. One of the modern hallmarks of pixel art is a constrained color count, but I never want to make it seem like that's a requirement of pixel art.
Colored outlines and adjusting outline to the tone is a great step! If
you feel the need to have outlines, that's a great way to go. Just using
a color as an outline instead of solid black is beneficial; solid black
is a really strong color and one of the hardest to work with,
especially if your body colors are relatively desaturated.
I like colored outlines! If you have to do outlines, colored is the way to go. The thing I don't mention is the technique/trap called sel-out, or selective outlining. I have a very complex relationship with sel-out. Ask me about it sometime and I'll talk about it. It might take a while to come up in a critique - it's typically a medium-grade technique (probably why I sometimes like it, as I'm a pretty medium-grade artist) and I don't tend to crit medium-grade pieces, and even then it's pretty rare nowadays. It was a fad and technique-theory controversy a few years ago. Still important to talk about though.
I mean a few things when I talk about coming right up to the edge with
the color, but I'll jump to the most extreme version of my explanation:
why outlines? Like, why use them at all? They have very concrete effects
on a piece; namely, they differentiate a section from the sections
around it. This could separate a sprite from a background, or internal
parts of a picture from other parts. They flatten a piece to the page
it's on, and in general give a slightly cartoony look. Why not try
working without any outlines at all?
Wondering what that'd look like here? Well, I was debating whether I
should show this to you, but as I was writing the posts, to guide my
thoughts I was making an edited version of the head to see if the advice
I was giving was sound and actually made things better.
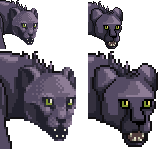 |
| Edit by me on the left, original on the right. |
That's heavily modified. I messed around with the head's colors and
anatomy and shading and slightly more than half as many colors as on the
original head. To stay on the topic I was talking about though, I
erased all the outlines! just look at it and think about what exactly
that choice is doing for the picture. I still have darkness where it
would fall (around the eyes, in the cheek under the cheekbone, in the
mouth), but I didn't enforce the separation with actual lines except
slightly around the far ear, which IS partially concealed by the rest of
the head, taking advantage of the separating force of outlines.
Hopefully that gets across some understanding of what I mean when I say
it's worth trying to limit or remove outlines. There will be pieces
where outlines are to your advantage, but don't let them be the only way
you define form - use your shading to do that.
The edit really is heavily modified. Originally it was a part of the original critique where I talked more heavily about outlines and their form-breaking nature, about color count, and about using shading to define form, but I abandoned that draft of the critique. It's not often I have to restart a critique because I'm not satisfied with how I'm going about things, but it happened with this piece. I went way more in-depth than I think was necessary or helpful. The second (and final) draft hits the important points more directly.
A line that didn't last long was a small explanation about the fact that I was showing off an edit. I've explained before why I don't do that, but to reiterate: what I did is not
the way. Do not imitate my side. Learn from it and apply the concepts you glean from it, but don't make my style your style.
I now go on to do a hell of a lot of editing.
Since you're wondering, let's see if we can't figure out how to get those wings to work, shall we?
For ease, we'll skip Step 1, which is figuring out how they connect to the body. Stick to pixel stuff for now.
 |
| With Internal Lines |
 |
| Completely Hollow |
Here I've torn out everything but the outlines on the front wing (the
one I'll be working with). I've also changed the fur colors a bit to
make things a bit easier to work around. My purpose is to show that,
even before you started shading your weren't going in fully equipped.
Shading is a powerful tool, but if your foundation is wonky, which I'm
sure you can see in some of the curves, then you'll have trouble
compensating for that later.
From here, the exact approach is really subject to your personal
preference. Pull up a small pile of wing references if that's important
to you, but I say feel free to deviate slightly if it feels better
aesthetically. For example, one thing I learned is that wing feathers
rarely have pointed ends, but to heck with that.
The trick I think is to go symbolic with things, by which I mean don't
bother trying to render as many feathers as an actual bird wing would
have. Wings have tons of feathers; instead, focus on giving the
impression of feathered wings. I chose to do this by using fewer large
feathers, sized so each has its own form. Here's a quick rundown of my
process, going with the idea that I'm keeping outlines. Remember - this
is MY process, not THE process.
 |
| Curves fixed, mostly. |
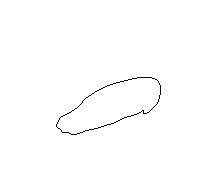
* Take the hollowed out wing and fix the curves and have a vague mental picture of where feathers might be.
 |
| One row added. |
* Moving from back to front, fill up the long end feathers. Remember
that feathers overlapping is what really contributes to a wing-like
appearance. How exactly you do this is up to you, but my strategy is to
avoid any outlines but the ones around the outside of the wing. Fill in
each feather with a different color, putting no hard outline barriers
between feathers.
 |
| 2 Rows and change. |
 |
| 3 Rows. |
 |
| 4 Rows and change. |
* Do the next row up, filling in the little gaps left between them with
other feathers. Keep doing this until you're pretty near the top.
 |
| 5 Rows. |
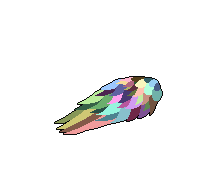 |
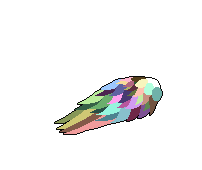
| Completed "Colorful Wing" |
* Each feather I've done up until the top has been pointed. I'll round
off the feathers near the top. I end up with this very colorful wingful
of feathers!
* Now comes the hardest part: realizing that you're not going to
actually do each of those feathers, and that some of them are going to
just blend in. Set yourself a light source and pull up your wing
palette. I'll be using the three wing colors you had before, and
putting the light source toward the top right.
 |
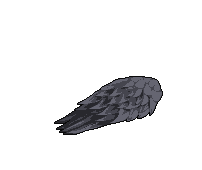
| All grey. I actually quite like this one! |
* For each feather, I pick which of the three colors will be dominant
in that feather and fill it with that. That'll result in a wing with no
concrete feather distinctions, but very clear delineation of where the
light is focused. Frankly I think it looks pretty good!
I didn't mention it in the description, but I did the work away from the outline and then moved it on top of the color before moving the next row of color out of the outline to shade.
* I go back to the colorful wing but keep a copy of the three-tone one
on the page. I take one row of feathers from the colorful wing,
starting at the top, and fill them in with the tone I chose for them on
the grey wing - the bright color for the top row. I then add touches
of shading around the edge of the feather where the one underneath it
will have a shadow cast upon it. I add in the next row of colorful
feathers and repeat, working my way down the wing. I don't immediately
start using the darkest color, I slowly phase in using it in the
darkest shadows as I move down the wing. Similarly, by the end of the
wing I'm only barely using the highlight color.
 |
| Fully refined for its outline. I still prefer without the outline, but hey, it's not my piece. |
* Once you're all the way through, clean it up and do any antialiasing
you feel is necessary. If it was me I'd be trashing the outline pretty
thoroughly, but I'll keep it here. A couple notes about antialiasing:
keep in mind that antialiasing is basically buffering the outline
itself, and as such is essentially a modification of whatever curve you
had before. Keep in mind that your curves should be fairly smooth. Be
careful of banding - you had a lot of banding on the original piece. If
you don't know what that is let me know. The biggest overlap between
antialiasing (good) and banding (bad) is that you should almost never
antialias a 45-degree angle.
Didn't feel like clogging up a a three-post followup with a description of banding that might not have been needed. If you the reader doesn't know, I talk about it a LOT in other lessons. Or ask, I'll explain it.
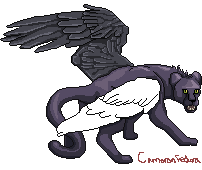
 |
| Look at that majestic beast. |
* Alright, pretty darn balanced now. I stuck it back on the original piece.
The basic procedure here, removed from the context of wings and
feathers, is simple. Give yourself a general outline shape, define your
details with color blocking, apply your final palette and light source
to the color blocks, and refine the details with shading to add depth.
It's a pretty intensive process, but produces consistent results. I
could apply the same concepts to the head, or the legs, or the tail, or
anything. Now, the final result here looks a lot like my work because
of my own tendencies in it. But hopefully this provides an insight as
to how you can try to make wings with form without meticulously picking
out each bit.
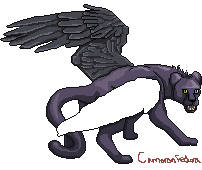
I think, having gone through the process now, that the biggest problem
with the original wings is that they're TOO consistent. There's no
variance of the highlights and shadows as you move along, and elements
don't seem to obey the lightource. Put those things, your shape and
light, above detailing each little thing.
And yeah, this is a tonnnnn of work. You made a big piece, 200x100 and
largely filling the canvas. I rarely work that big, and even more
rarely have the dedication to really detail it all in full. I know that
tiredness with a piece all too well. I mean, hey, I took two days to
follow up on this because of that edit - it's not easy or quick. So
don't worry about running out of steam here :) And a font signature is a
decent idea, though it's better if it doesn't do automatic
antialiasing since that's not really pixel art (even though it's just a
signature so no one would care really).
I'm looking forward to what you pull up next! (and thank you again for being so receptive to my ramblings :D)
She hasn't gotten back about the follow-up yet, but given that it's been a few days I think it's been enough to share this five-post epic of a critique. Hope it helps you at home as well! And hopefully it won't be a whole year before the next one again.
End Recording,
Ego.


No comments :
Post a Comment